How to Setup Open-Source UltraVPN in Ubuntu
- by Martin Kaba
- on Tue Nov 24, 2009

In Windows its quite easy to setup a VPN (virtual private network) client like the open source UltraVPN client that is fully based on OpenVPN. In windows system it takes less than a minute to get UltraVPN up and running - time spent in downloading, installing and creating a UltraVPN account. In Ubuntu takes a few extra minutes and you might need a windows partition.
- VPNs become handy when you want connect to websites with geographically blocked contents, when you seek for a secured access to files and folders, or for some extra privacy etc etc. UltraVPN offers the necessary anonymity for home users.
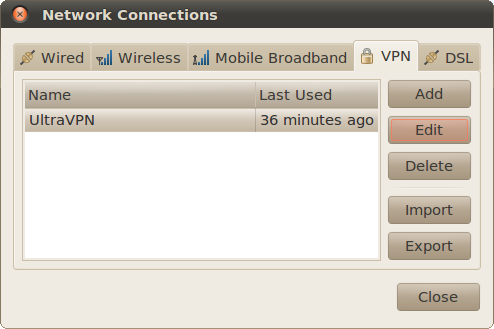
Lets get started: If you haven’t installed any VPN protocol in your Ubuntu box, then you’ll notice that VPN tab in Preferences -> Network Connections has no enabled buttons. What we need here is the OpenVPN protocol.
Installing OpenPVN;
We need to install 2 packages; openvn and network-manager-openvpn. If you install the second, it will install the first as a dependency; sudo apt-get install network-manager-openvpn
Now we need the UltraVPN certificates. How to get one;
(Beg for one, buy it or steal it but don’t be caught.) If you have a windows partition, Windows PC or Windows as guest on VirtualBox like me then install UltraVPN, move to C:\Program Files\UltraVPN\config and copy these two files; client.ovpn and ca.crt, paste them into a newly created by-you “UltraVPN-Conf” folder in the Ubuntu home folder.
- Rename the client.ovpn file to UltraVPN.conf
- Rename the ca.crt file to UltraVPN.crt
The fastest way to obtain the UltraVPN certificates is to install UltraVPN in Ubuntu with WineHq. Download UltraVPN, right-click on it and run with Wine, then use the command-line to copy, paste and rename the needed files into the UltraVPN-Conf folder
1 2 | cp ~/.wine/drive_c/Program\ Files/UltraVPN/config/client.ovpn ~/UltraVPN-Conf/UltraVPN.conf cp ~/.wine/drive_c/Program\ Files/UltraVPN/config/ca.crt ~/UltraVPN-Conf/UltraVPN.crt |
Your last chance; download the UltraVPN configuration package from from HERE and place it in your home folder.
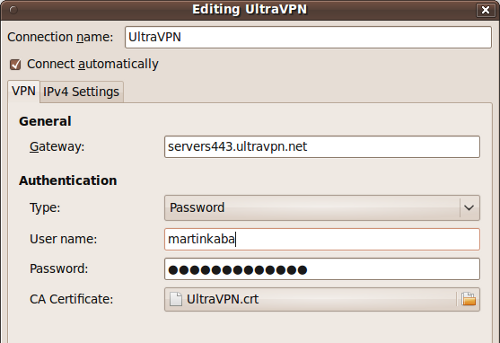
Now move to System -> Preferences -> Network Connections, in the “VPN” tab, “Import” and select UltraVPN.conf. Fill-in user-name and password with your registered UltraVPN account.
Hit the “CA Certificate” filed and import the UltraPVN.crt

(Optional)
In the “IPv4 Settings” tab;
Method: Automatic (VPN) addresses only
DNS servers: 208.67.222.222, 208.67.220.220 (which are OpenDNS servers)
[Update]
In DNS severs, you can also use the new free DNS service called Google Public DNS, just drop-in the Google Public DNS IP addresses, separated by a space: 8.8.8.8, 8.8.4.4
Hit “Apply” and you’re ready to VPN with UltaVPN
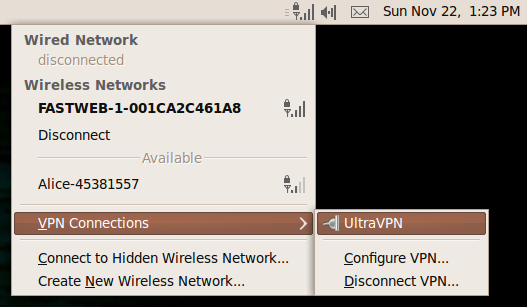
Now left-click on the “network connections” on the top left of the screen -> VPN Connections -> UltraVPN (see screenshot below)

[Update]
1) If you get the message “no valid network secrets” then restart your network connections with: sudo service network-manager restart (Thanks Baddwolff).
2) Spotify is not yet available in your country, from Italy you can use this walk-through.
UltraVPN client is a free download for Mac and Windows. It is released under GNU/GPL license


Pingback: toorghezi
Pingback: Martin Kaba
Pingback: onion_soup
Pingback: Bharat Ojay
Pingback: Learn Hacking How to hack facebook,yahoo and other all hacking » Blog Archive » >What Is VPN? and A Huge List of VPN Downloads & Proxy Servers